
Build Your Own Killer Spotting Scope
Quick version:
- Buy a used Meade ETX90 for about $100 plus shipping.
- Buy a new or used 25mm Plossl telescope eyepiece for about $20.
- Buy a very sturdy video tripod for about $120 new (less for used).
- Put it all together, and you have a GREAT 50X spotting scope, for less than $250, that is good out to 1000 yards and beyond (depending on mirage).
So until recently I have been dissatisfied with the performance of my spotting scopes. For the most part my approach has been to use a high-power scope (like 27X) and turn up the magnification for spotting. It works, but sometimes does not provide enough zoom to make out small details. What I wanted was more magnification and more aperture. I assembled a system that works very well so if you want to ‘skip to the chase’ see the parts list at the end of this article.

The Harbor Freight spotting scope is available for $40 with the ubiquitous 20% off coupon
The Cheap Path
As many of us have I started by buying an inexpensive (OK cheap) spotting scope. A lot of spotting scopes, like the one I purchased from Harbor Freight for $40, are all made by the same manufacturers in China and relabeled by whatever company to sell under their name.
Though it works fine for shorter range spotting, like 100 yard targets, this spotting scope has two main issues… One, the tripod it comes with is really flimsy and not very usable. Two, the zoom eyepiece it comes with (20X-60X) is pretty lousy optically. The eye relief is very short and therefore the user’s eye has to be very close (eyelash scraping close) to the eyepiece especially at higher zoom. Now, since I also own a telescope, I have a few extra eyepieces laying around. So I unscrewed and removed the stock HF scope eyepiece and substituted a proper 25mm Plossl telescope eyepiece. This worked, substantially improving the quality of the image and increasing eye relief. But I wanted more…
I Want More
However I wanted more and found another direction to go in with excellent results. There were several things I was looking for:
1. Larger aperture - A larger objective (front lens) on any optic typically improves light gathering power and improves detail. There are other things at play such as focal ratio but this fact is generally true. A larger objective is better for optical performance.
2. Low cost - I too have gazed through a $3000+ Swarovski spotting scope and seen the obvious improvement in the image. They really are very nice, but also very expensive. I wanted something much less expensive than that, say closer to $300.
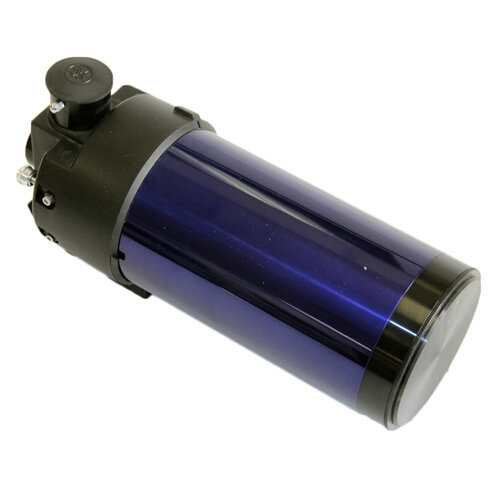
The Meade ETX90 Optical Telescope Assembly (OTA)
Choosing the Optical Tube Assembly
In the ultra zoom lens photography and bird spotting world there is an option that many are familiar with, that is Matsukov-Cassegrain Telescopes also known by their acronym as MCTs, or also as ‘Maks’. They belong to a class of telescope called a catadioptic or ‘cat’ for short. This is essentially a reflecting telescope design that allows for a powerful optic in a relatively small, lightweight, inexpensive package. They are available used for $90-$130 for just the optical tube assembly (or OTA); I purchased a Meade ETX90 MCT OTA from the CloudyNights.com classifieds section for $100 plus shipping. The Meade ETX scopes are popular and therefore easy to find.
You do not need the computerized fork assembly unless you also plan to use it as a goto telescope, which you can of course; that is what the ETX is made for. Also, with the right set of T-adapters, the ETX telescopes can also be attached to your DSLR camera and used as a super-telephoto lens, and I do mean super. The Meade ETX90 has a focal length of 1250mm so those familiar with telephoto lens specifications will know just how powerful this is; it is about 4-5X more power than what a typical telephoto camera lens has. For the photographers out there, this is an f/10 stop lens (fixed, not adjustable) so it is not very fast. The images are great but the ISO needs to be increased, or the shutter speed slowed, even for daylight photography. A tripod is a must.

An example of a 25mm Plossl eyepiece
Choosing the Eyepiece
As with any telescope, the eyepiece that is used is very important. It determines the power or magnification of the view you see through the telescope and also the quality of the view. Fortunately there are many inexpensive options out there. Decent Plossl eyepieces are widely available new and used. For example, this 25mm Plossl eyepiece made by Svbony has a street price of $20 and is available at Amazon and other retailers.
Get Stable
The magnification of an OTA/eyepiece combination can be calculated by dividing the focal length of the OTA by the focal length of the eyepiece. So we have a Meade ETX90 OTA at 1250mm, and a Svbony 25mm eyepiece at 25mm for a magnification of 1250/25= 50X. In my experience, 50X is plenty for spotting hits out to 1000 yards and beyond. However 50X is a lot of magnification, about twice as much as most long-range variable rifle scopes at full power. Therefore a very stable tripod is needed or the image will be so unstable that it will be difficult to see, or even difficult to focus, since the image will shake violently anytime there is even a slight disturbance. For stand-up spotting I use a strong video tripod with a fluid alt-az (tilt-pan) head made to hold medium-sized video cameras. These video tripods are typically rated for a load around 12 lbs. (which means it is very stiff) and can be bought for around $120 new. For something much shorter, and more portable, there are tabletop style tripods that have single-segment legs and only stand a few inches tall. This would be ideal for using the scope lying on the ground, allowing the shooter to go back and forth from the rifle to the spotting scope.

An example of an inexpensive video camera tripod. Stability is very important and video tripods are made for stability.
Get It Together
Here is the complete package: the ETX90, the Plossl eyepiece (this one is a 19mm) and the video tripod.

The eyepiece is used in the top position since it places a small mirror built into the telescope into the optical path. This mirror orients the image correctly so that up-down and left-right directions are correct as seen through the eyepiece. Some OTA assemblies only have the rear opening and thus for an image to be oriented correctly one will need a 45 or 90 degree prism or mirror eyepiece. The ETX 90 come with this 90 deg mirror built in to the assembly so a prism is not needed; that saves a little money.

To get an idea of the performance of this setup, here is a photo that approximates a naked eye view to a power line pole and tree line that is located about 1000 yards from the spotting scope’s location; The aim point is circled in red.

Here is the view of the same object through the eyepiece. There is enough magnification and detail to spot a bullet impact on a painted target at 1000 yards and beyond. The actual view through the eyepiece is slightly sharper and brighter than the one shown below, but this is a decent demonstration of the optical performance. Note that there is some mirage present on this image, particularly on the power line pole.

So for about $250 you can have a spotting scope setup that is rock stable, has great optics, and works to very long distances. Note that for a little more money an adapter can be bought that allows attachment of a DSLR camera to the back of the same optical assembly, turning the ETX90 into an extreme telephoto lens. This allows detailed photos of the target, and video recordings of impacts (if the camera has a video function).
We recommend this setup for long-distance spotting, and we will continue to use ours as we feel no need to upgrade to anything more. This does the job.
NOTE: To determine the magnification of this setup (or any telescope), divide the focal length of the telescope by the focal length of the eyepiece. For example, the ETX90 has a focal length of 1250mm. Therefore:
With the 25mm eyepiece, magnification = 1250mm/25mm = 50X
With the 19mm eyepiece, magnification = 1250mm/19mm = ~66X